1. Thick Marker Side-Profile Sunflower on Tan Tote
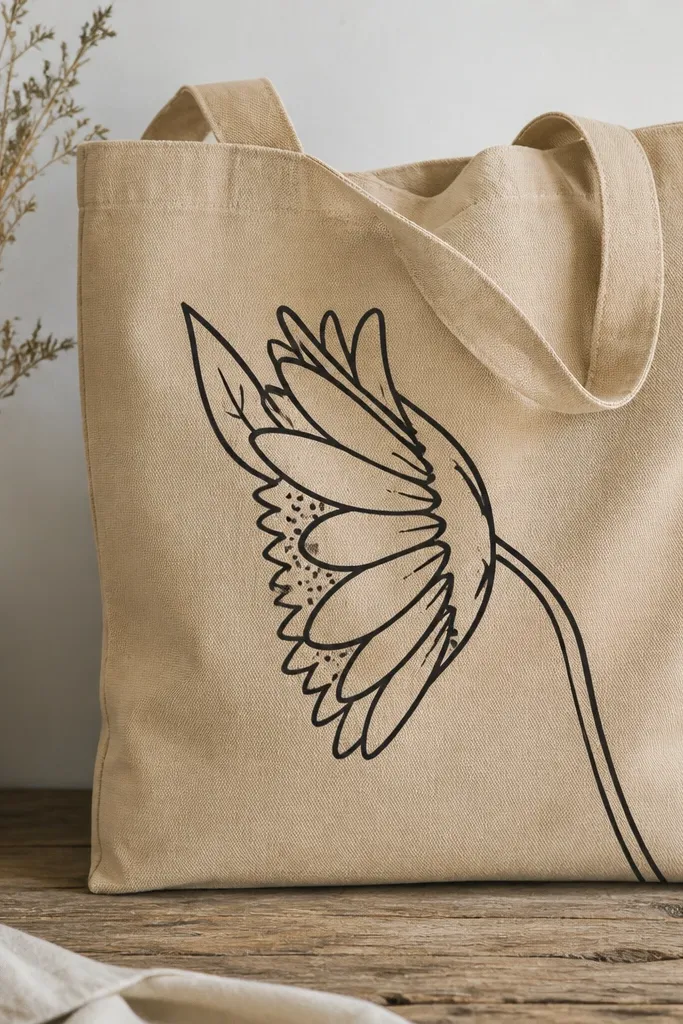
This one is my go-to when I want "done" fast. The black marker outline on tan canvas reads clean and graphic, even if your petals aren't perfectly even. Draw the head facing left so your eye follows the stem curve - it looks balanced on a tote handle area. The seed dots keep the texture simple without needing crosshatching. I like it most for neutral outfits because the tote stays the focal point without fighting bright colors.
Start by lightly sketching the side head: a rounded seed base with a flatter back edge, then add 10 to 14 comma-like petals along the front. Outline everything with a thick black fabric marker, then fill the center with small seed dots - aim for uneven sizes so it looks natural. Add one leaf behind the head using a single teardrop shape with a short center vein line. Finally, draw the stem as one smooth S-curve from the base of the head down to the tote's lower third.
Good to knowPress the marker tip against scrap canvas first to set the ink flow. If it skips, warm the marker between your hands for 10 seconds.
Common mistakeDon't shade the petals with lots of strokes - it makes the linework look messy and cheap.
2. White Paint Pen Sunflower on Black Denim Pocket
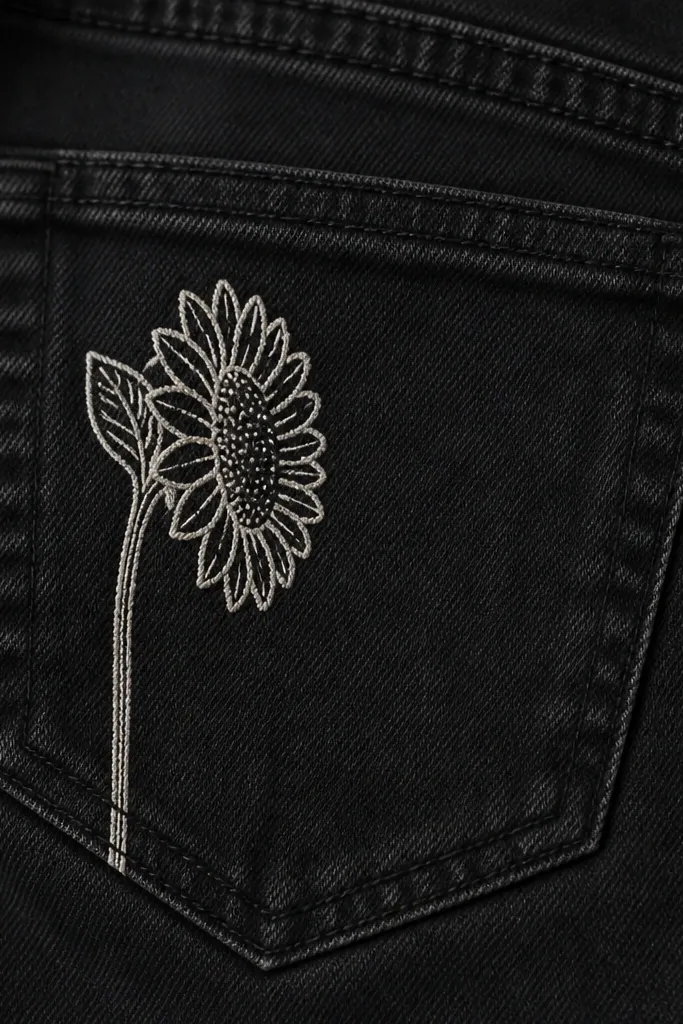
White paint pen on black denim is the easiest way to get high contrast without waiting for paint to dry in layers. The side-view head keeps the design from looking crowded on a small pocket area. I like the head facing right because it lines up nicely with the pocket's natural curve and makes the stem feel anchored. The leaf behind the flower adds depth so it doesn't look flat. This works well for anyone who likes clean street style and wants one small statement spot instead of a full back print.
Mark the pocket placement first: put the seed head about 1 inch above the pocket seam and centered slightly toward the outer edge. Use a medium paint pen to draw the seed base and outer petal arcs - keep the petals short so they fit the pocket space. Add seed dots in the center, then outline the seed base again lightly so the dots don't fade into the denim texture. Finish by drawing a stem line that follows the pocket seam and a single leaf tucked behind the head.
Good to knowLet the paint pen dry 15 minutes, then heat-set by ironing inside-out with a thin cotton cloth on top for 20-30 seconds.
Common mistakeDon't flood the denim with paint - thick blobs crack and look lumpy after washing.
3. Light-Yellow Outline Sunflower on Cream Cardigan Sleeve
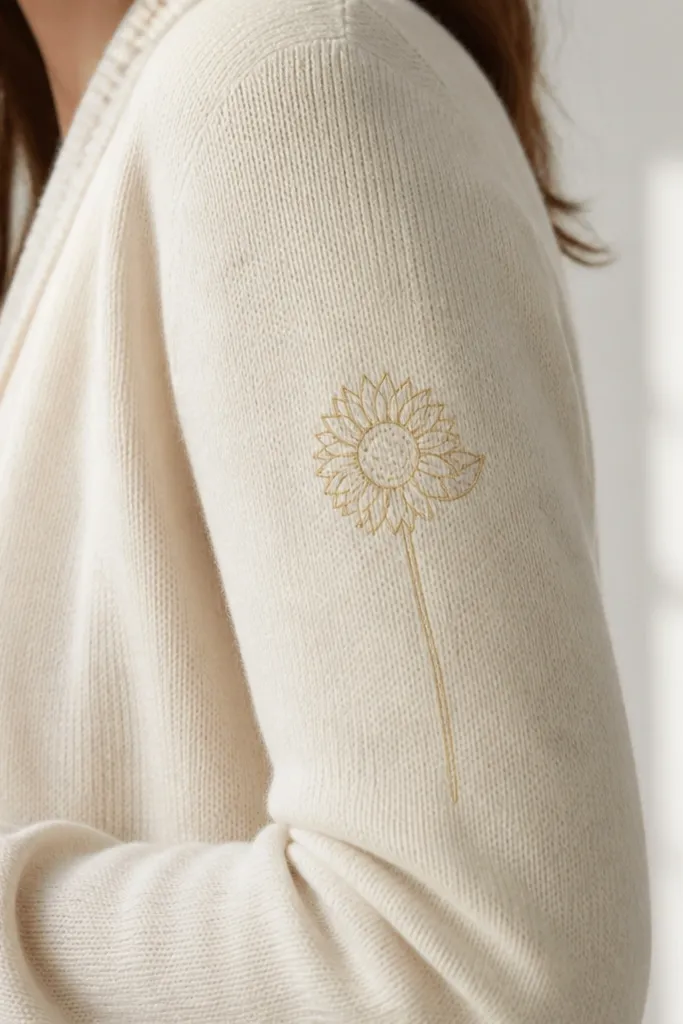
Light-yellow ink on cream fabric feels soft and wearable, not loud. On a cardigan sleeve, the smaller size keeps it from looking costume-y. The side-view head gives movement - it looks like it's leaning forward rather than sitting flat. I've found this color combo works especially well if you wear warm neutrals like oatmeal, camel, or beige because the yellow looks like it belongs. It's a good choice for casual days when you want something sweet without heavy contrast.
Start by drawing the sunflower head about 2.5 inches tall, facing left. Use a thin fabric pen to trace the petal arcs in a single row - 8 to 12 petals is plenty. Add dot seeds inside the head using the pen tip, then draw one leaf behind the head with a narrow teardrop and a single center vein. Finally, connect it with a thin stem line that stops 1 inch above the cuff so the design feels intentional and not crowded.
Good to knowIf your pen looks too pale, outline the seed base with a slightly darker yellow so the center reads clearly.
Common mistakeDon't make the petals too long - long arcs blur on knit and make the flower look stretched.
4. One-Line Stem Sunflower on Denim Jacket Back Side Panel
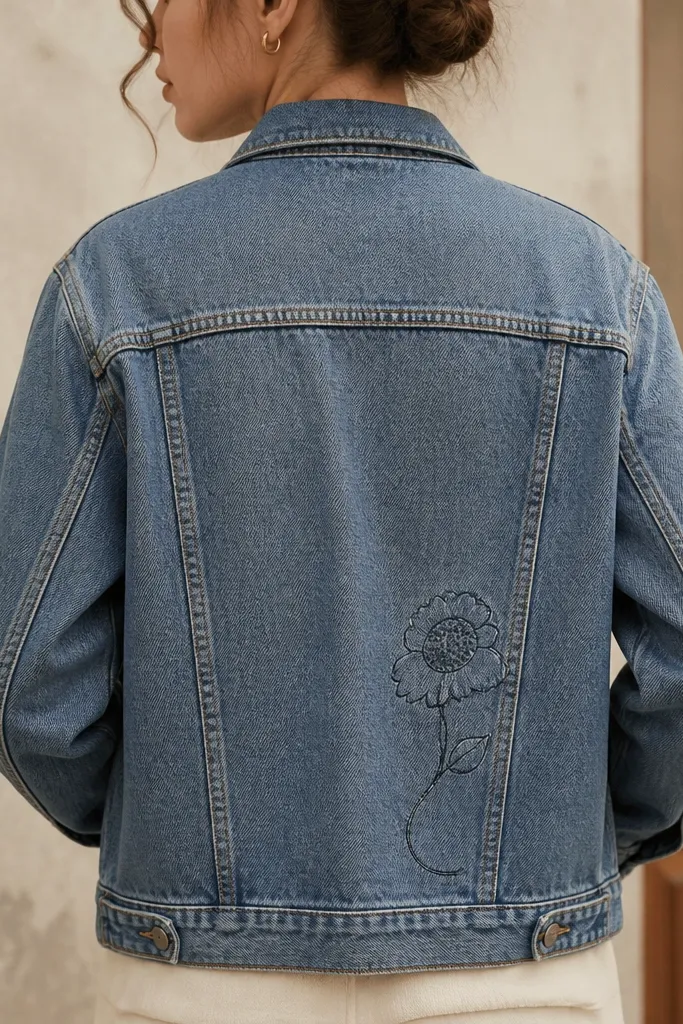
This design looks artsy but still low maintenance because you're committing to one line weight. The one-line stem anchors the whole piece, so even if your petals wobble, the overall shape reads as intentional. I like placing it on the side panel near the waist because it mirrors body curves and doesn't compete with back yokes or seams. The tight seed dot cluster keeps the center from looking empty. It's flattering for most builds because the vertical stem length draws the eye down.
Sketch the stem first as a single curve from waist height down and slightly outward. Without lifting your pen, draw up to the seed base and outline the side head, then add small petal bumps along the front edge. Fill the center with a dense dot cluster, not long strokes. Add one leaf behind the head, using the same line weight so it blends into the one-line style. Finish by tracing just the outer head outline once more for crispness.
Good to knowUse a permanent fabric marker with a chisel tip for the line consistency. Test on a denim scrap first - chisel tips behave differently across brands.
Common mistakeDon't add extra stems or extra flowers - one sunflower looks clean; multiple lines make it look chaotic.
5. Sunflower Side View with Dotted Center Only
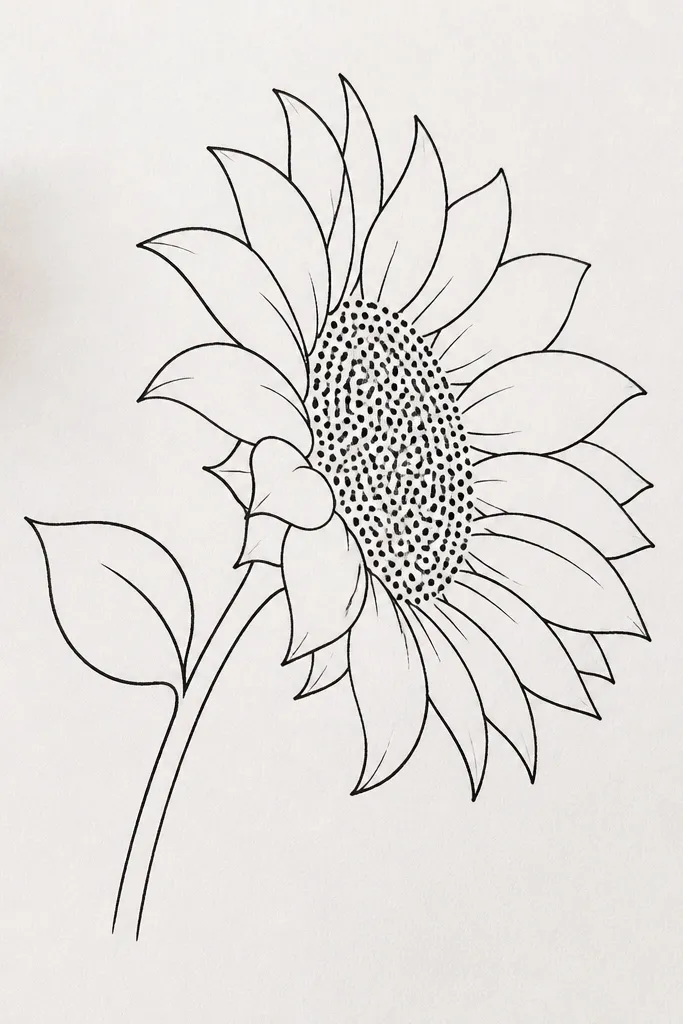
If you're worried about drawing the center, this is the version that forgives you. The petal outlines give the flower its identity, and the dotted center gives it texture without needing shading. It's perfect for paper upcycling, bookmarks, and labels because it stays crisp even when you photocopy or scan it later. I like this style for people who want a "clean sketch" look that still feels handmade. On lighter paper, black ink looks sharp; on colored paper, the dots create a nice contrast.
Draw the side head as a rounded seed base with a flatter top edge facing away from you. Add a single row of petal arcs along the front - keep them short and consistent in height. For the center, dot in 25 to 40 tiny circles, leaving a little white space so it doesn't look like a blob. Add a leaf behind the head using one teardrop shape and a single center line. Finally, darken the outer head outline and leaf outline so they match in weight.
Good to knowUse a 0.3 or 0.5 black fineliner for the dots. A wider tip makes the seeds look like confetti.
Common mistakeDon't overfill the center - if every space has a dot, it turns into a gray mass.
6. Fabric Transfer Sunflower Side View on Thrifted Scarf
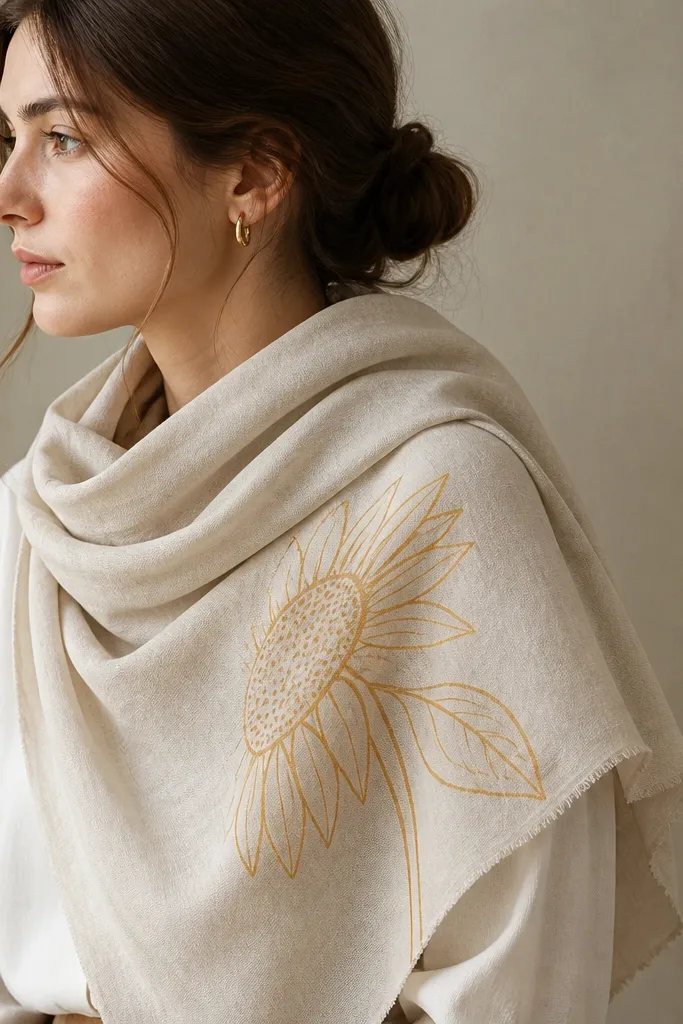
Transfers are a lifesaver when the fabric is slippery or you're working with thin material like rayon or a silky scarf. The side-view shape transfers well because it uses big, clear edges - you don't need delicate shading. I like using muted yellow and tan so it looks vintage instead of neon. This style also sits nicely on patterned fabric because the sunflower isn't trying to hide the whole background. If your scarf already has a busy print, keep the sunflower single and small.
Start by printing or tracing your sunflower side view onto transfer paper, then cut a clean border around the head and leaf only. Place the scarf flat and smooth, then tape the corners so it doesn't shift. Iron according to the transfer paper directions, usually 20-30 seconds per section with firm pressure. After transfer, touch up the outline with a fabric marker if any lines look thin. Let it set, then gently press again with a cloth over it to lock the ink.
Good to knowDo a test transfer on a scrap piece of the same fabric first. Rayon can shift slightly when it heats up.
Common mistakeDon't place the transfer on wrinkled fabric - the sunflower edges blur and look like a failed stencil.
7. Sunflower Outline on Upcycled T-Shirt Sleeve Cuff
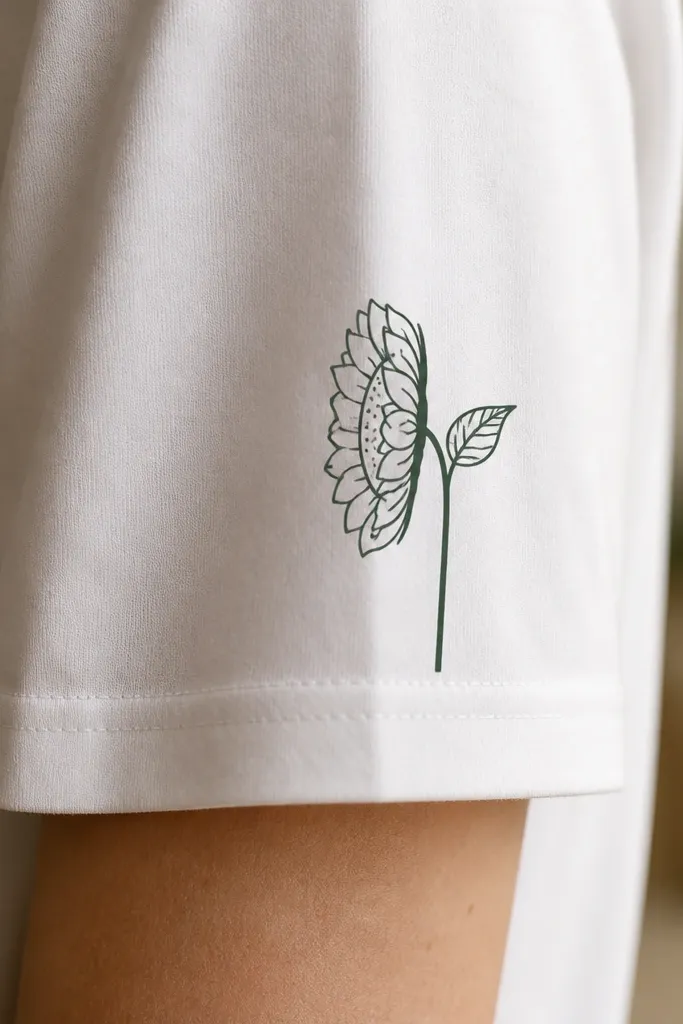
Cuff placement is underrated. It's small, it frames your wrist, and it looks intentional even if you wear a plain shirt. Dark green outline on white fabric feels fresh and not too loud, and it hides minor unevenness in the line. The side head faces left so the petals flare toward the cuff area where they catch light. Seed dots keep it from looking like a simple scribble. This works great for everyday wear because it doesn't need bold color to read.
Fold the sleeve flat so the cuff seam lines up. Mark a spot 1 inch above the seam and center it. Draw the side head about 2 inches tall, then add 9 to 13 petal arcs along the front edge. Dot the center with small green dots, then draw a single leaf behind the head with a short vein line. Finish with a thin stem line that stops before the cuff seam.
Good to knowUse painter's tape to create a straight reference line for the cuff. It helps your stem angle look consistent.
Common mistakeDon't use a thick marker on fabric that wrinkles - the outline will crack at folds.
8. Sunflower Side View in Cross-Stitch Style Lines
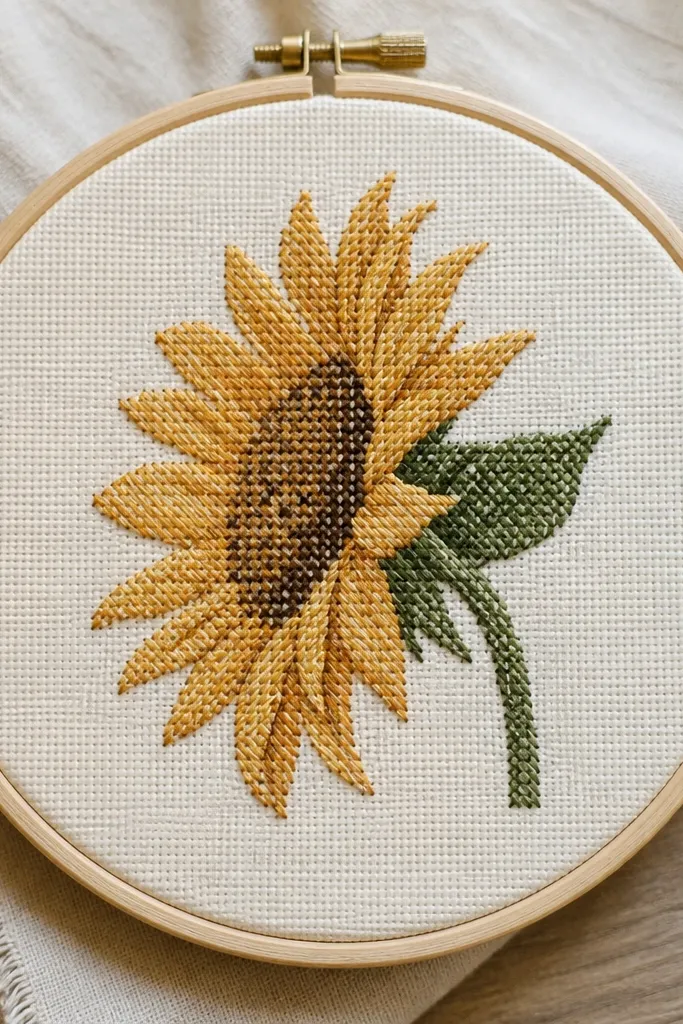
This one gives you a stitched look without committing to full embroidery. The side-view shape makes the cross-stitch effect believable because the petals have a clear edge. I used it on a lightweight upcycled pillow cover and it reads like texture from across the room. The diagonal lines create movement, and the seed dots keep the center from looking flat. It's flattering on neutral homes because it adds texture without loud color.
Sketch the side head and leaf first in pencil on fabric. For the petals, draw short diagonal line pairs that resemble tiny cross stitches along the petal edge - keep them small so the petal silhouette stays clean. For the center, do dot seeds plus 5 to 8 tiny diagonal marks to suggest seed variation. Outline the outer head and leaf with a darker thread-like color using a fabric pen or paint pen. Add the stem as one thin line that connects the head to the leaf base.
Good to knowIf you're using paint pens, let each petal section dry for 5 minutes so the diagonals don't smear together.
Common mistakeDon't make the diagonals too long - long strokes turn into a scribble instead of a stitch effect.
9. Sunflower Side View with Two-Tone Petals
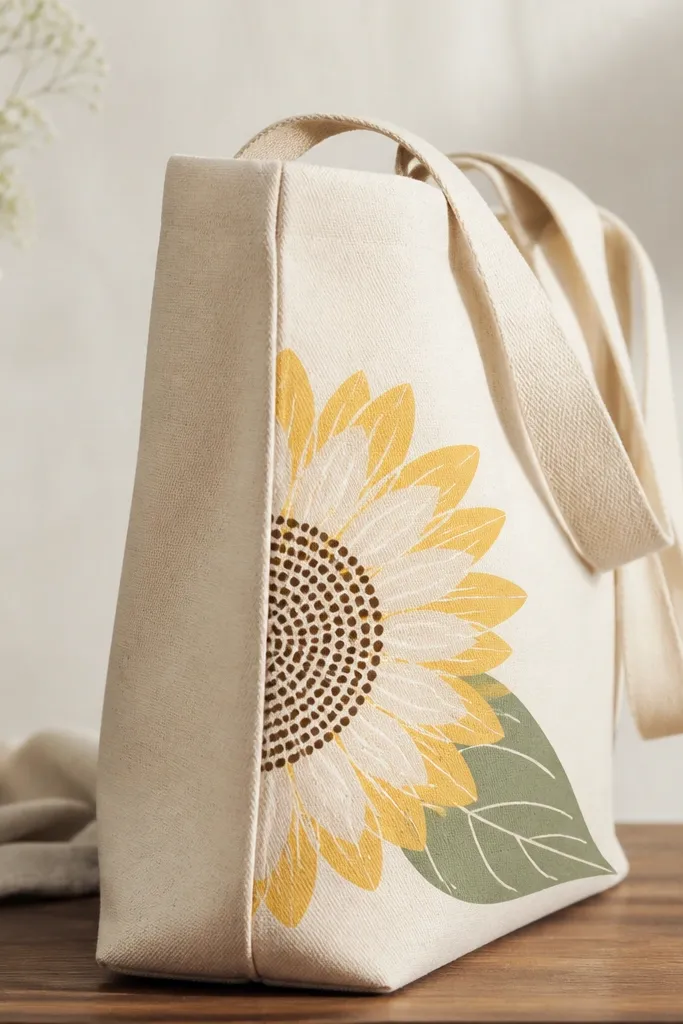
Two-tone petals make a side-view sunflower look dimensional without extra shading work. You get a highlight effect because the inner arcs sit slightly offset from the outer arcs. I like this on plain canvas bags and plain T-shirts because the color difference does the heavy lifting. The dark brown seed dots ground the center so it doesn't float. This style works well for people with warm skin tones because golden yellows read cozy instead of harsh.
Draw the side head outline in dark brown first. Add an outer row of petal arcs in golden yellow, then place a second inner arc row in pale cream - keep the inner row shorter so it sits like a highlight. Dot the center with dark brown seeds, mixing dot sizes so it looks natural. Draw one leaf behind the head in muted green, then add a short vein line. Finish with a stem in the same muted green and keep it thin.
Good to knowUse a stencil or a scrap-paper guide to keep the inner arc spacing consistent across the petals.
Common mistakeDon't use two close yellows that are too similar - the petals blur together.
10. Sunflower Side View Stencil on Felt Keychain Tag
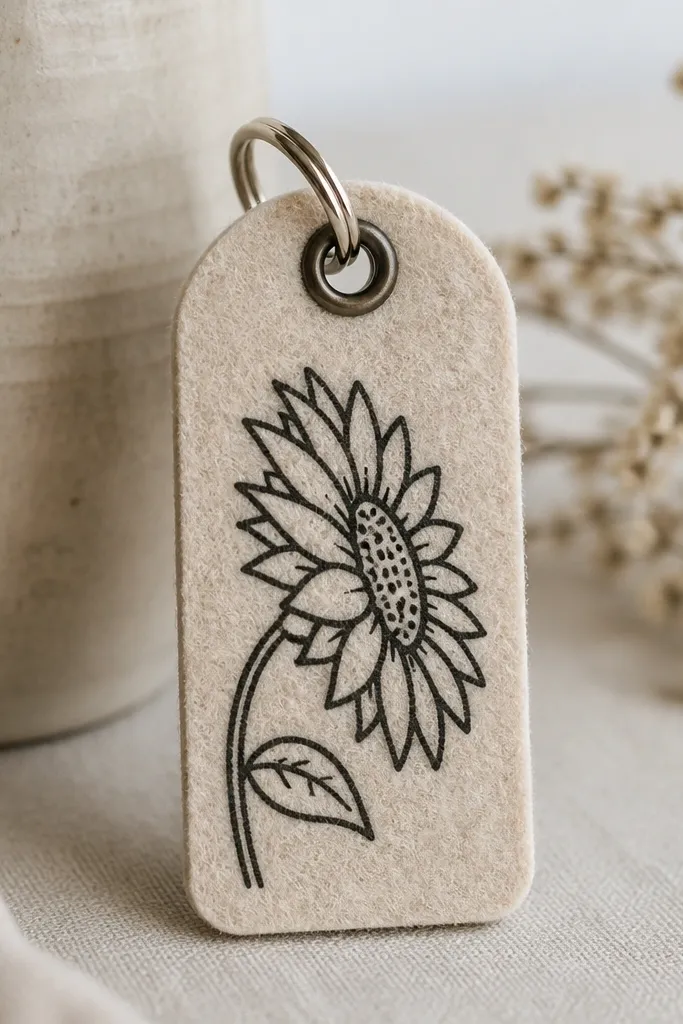
Felt projects are where stencils shine. When you're working with a small tag, the side-view sunflower stays readable even at a tiny size. Black stencil ink on beige felt looks clean and classic, and it hides slight hand pressure differences. I like the center dots because they look like felt texture from a distance. This is a great option when you want a low maintenance drawing that still looks sharp up close.
Cut a felt tag about 2.5 by 3.5 inches. Place a sunflower side-view stencil on top and tape it down so it doesn't slide. Dab stencil ink or fabric paint with a sponge - use light pressure so the edges stay crisp. Let it dry, then add a second pass only on the petal outline if any lines look faint. Finish by drawing a single small leaf vein line with a fine black pen and trimming any paint smudges with scissors.
Good to knowWarm the stencil slightly with your hands before applying paint so it sticks without slipping.
Common mistakeDon't flood the sponge - wet paint bleeds under the stencil and ruins the sharp edges.
11. Sunflower Side View on Upcycled Denim Tote Strap
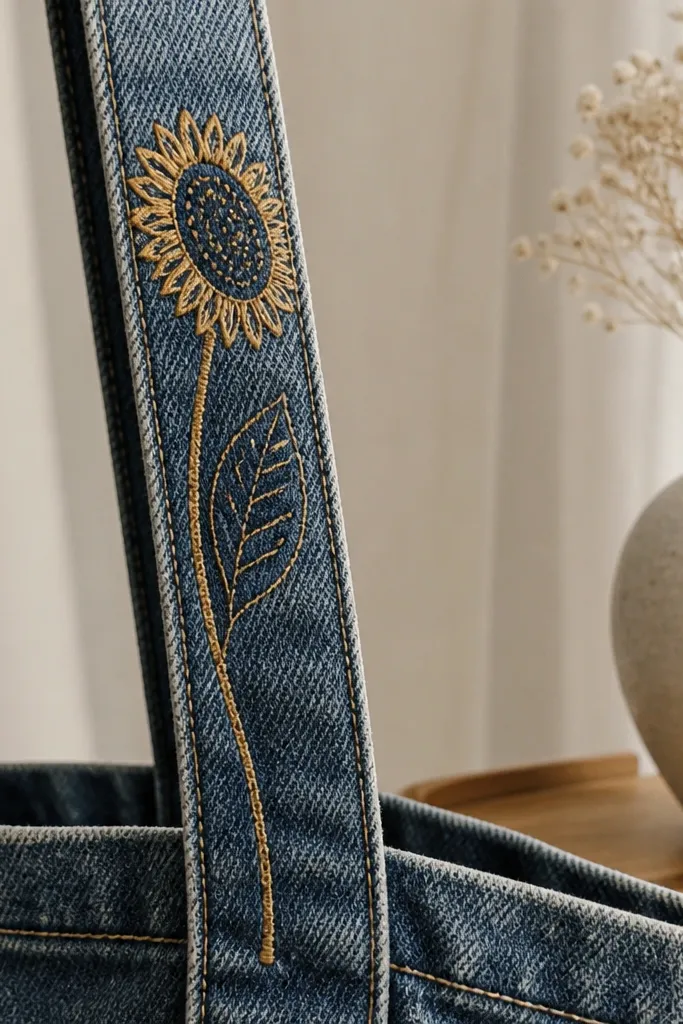
Placing the sunflower along a strap seam makes the design feel like it's growing with the bag. The side-view head looks like it's turning toward you as you carry it. Denim texture helps the seed dots look organic - they don't need perfect spacing. I like this for people who carry their bag close to their body because the strap art shows often. It also works great for larger bags since the strap has room for a medium-sized head.
Measure the strap width and place the head so it sits centered on the strap, about 5 inches above the bag body. Draw the side head facing toward the bag interior so the petals arc forward. Add petal arcs in a single row and dot the center with a consistent seed dot pattern. Draw the leaf behind the head and keep it narrow so it doesn't fight the strap thickness. Finally, connect with a stem line that follows the strap seam, then outline just the outer head shape again.
Good to knowUse a ruler to keep the stem parallel to the seam. Even a small angle shift makes it look off.
Common mistakeDon't put the head too close to the strap edge - the petals look cut off when you grip the bag.
12. Sunflower Side View with Minimal Leaf and Big Seeds
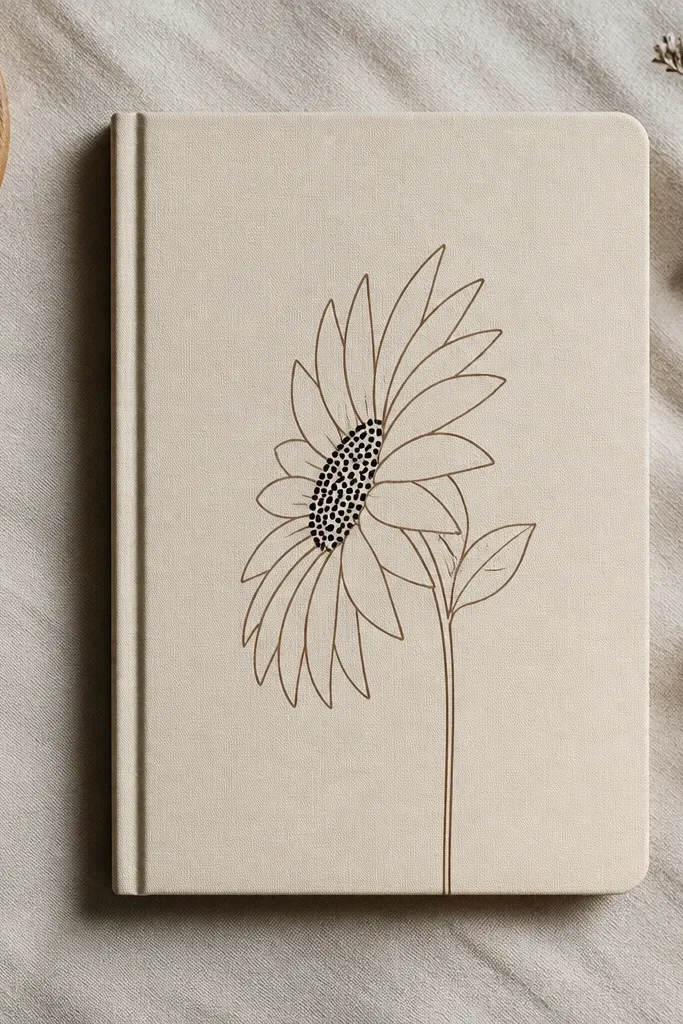
Big seed dots make the sunflower look bold even when the petals are minimal. I use this when the surface is busy or textured because the seeds become the main texture. The leaf stays small so it doesn't compete with the center. This style looks good on notebooks, planners, and upcycled journal covers. If your hands shake a bit, the big dots hide unevenness better than tiny detailed seeds.
Draw the side head about 3 inches tall, facing right. Add a single row of petal arcs in dark brown, keeping the petals wider than they are tall. For the center, dot larger seeds - about the size of a small pen tip circle - and leave some gaps. Add only one small leaf behind the head, drawn as a simple teardrop with one vein line. Draw a thin stem line that curves slightly and ends near the bottom of the design.
Good to knowUse the same pressure for all seed dots. If dots vary wildly, it looks like accidental marks.
Common mistakeDon't add extra leaves. One leaf behind the head is enough for depth.
13. Sunflower Side View on Craft Paper with Watercolor Wash
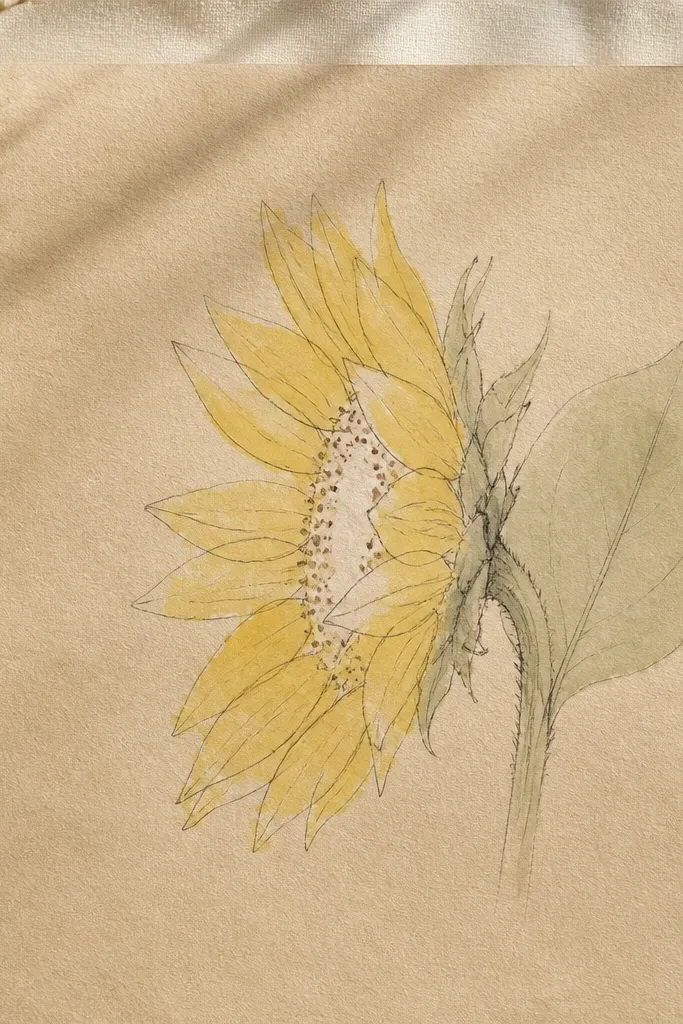
This is the version I use when I want the drawing to look soft but still low maintenance. You keep the outline simple and then add a light watercolor wash only on the petal area. Side view works nicely because the wash stays contained - it doesn't require filling a perfect circle. The center stays lightly dotted so it doesn't turn into a dark blot. It looks great for labels, greeting cards, and sticker sheets where people want a handmade feel.
Lightly pencil the side head and petal arcs, then outline in a fine pen or dark pencil. Wet just the petal area with clean water using a small brush, then paint a light sunflower yellow wash in quick strokes. Keep the center mostly unpainted, then add a few brown seed dots once the wash is dry. Add a pale green wash for the leaf behind the head, then let it dry completely. Finally, trace the outer petal and leaf outlines again lightly so the wash doesn't fade into the paper.
Good to knowUse watercolor paper if you can. Cheaper craft paper buckles, and your clean edges turn wavy.
Common mistakeDon't overwork the wash. Multiple passes make it look muddy around the petal edges.
14. Sunflower Side View on Upcycled Canvas Apron Waistband
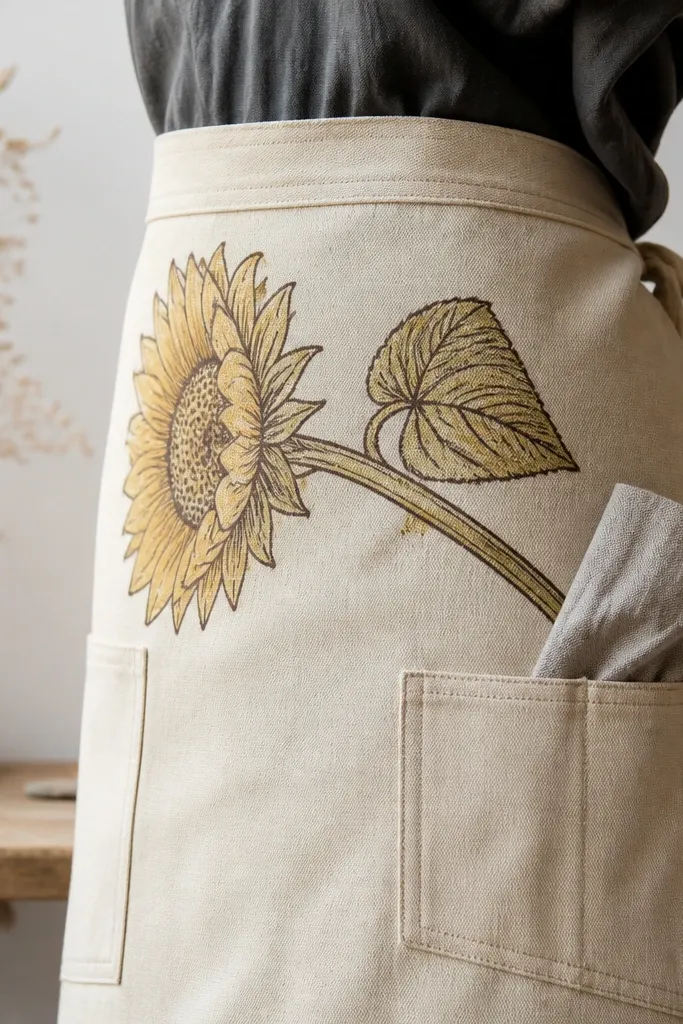
Waistband placement looks good because it sits at your natural break line. A sunflower here reads like a badge, not random decoration. I like dark brown outlines with a warm yellow fill because it looks like hand-block printing. The side-view head keeps it from needing a huge space, so it works on medium aprons too. Warm fills flatter skin tones under kitchen lighting, which sounds silly until you've worn a cool-toned print under harsh overhead lights.
Iron the apron flat first so the waistband doesn't wrinkle. Sketch the side head centered on the waistband, about 4 inches tall. Outline petals and the leaf in dark brown, then fill the petal areas with warm yellow - keep the fill inside the outline so it stays crisp. Add dot seeds in a darker brown for contrast. Draw the stem diagonally so it follows the curve of the waistband and ends near a side seam.
Good to knowUse a small foam brush for yellow fill. It gives you even coverage without streaks like a wide paintbrush.
Common mistakeDon't paint right up to the seam folds. The fill cracks where fabric bends.
15. Sunflower Side View on Wood Slice with Black Marker
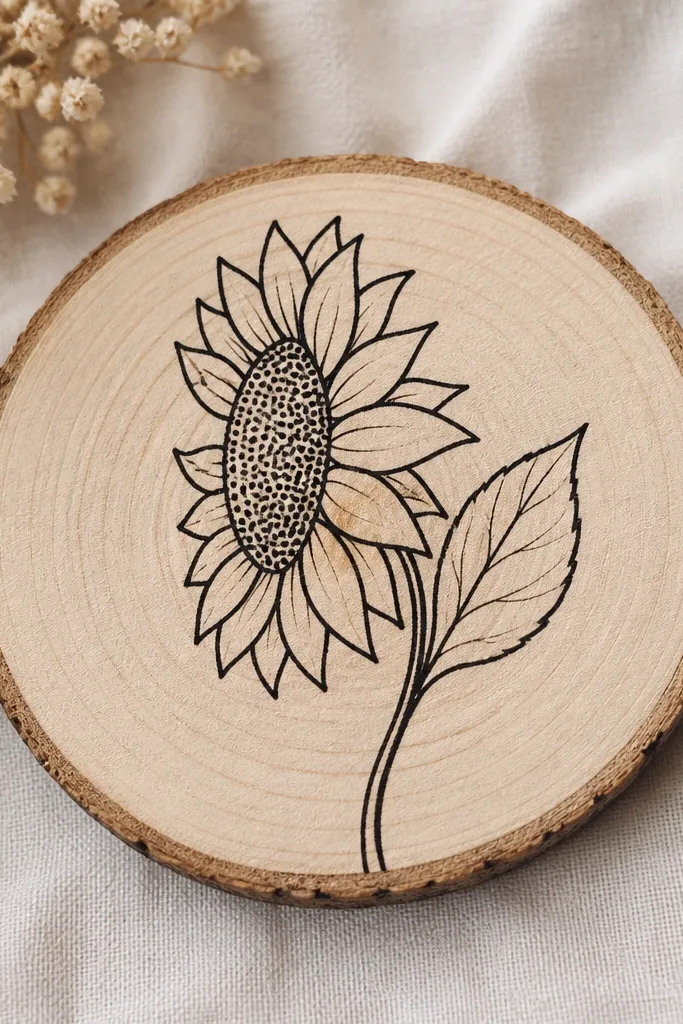
Wood slices make the linework look extra crisp because the surface has grip. A black marker drawing holds up well on wood, and the seed dots look like carved texture. Side view is perfect on a small circle because the design doesn't fight the round border. I've used this on coasters and hanging tags, and people always comment that it looks "clean" even when the drawing is simple. It's also low maintenance because you don't need to blend colors.
Sand the wood slice lightly so the marker doesn't catch on rough spots. Draw the side sunflower head first in pencil, then outline it in black marker. Add petal arcs in a single row and dot the center with small dots - keep them spaced so the wood grain still shows. Add a leaf behind the head using a simple outline and a short vein line. Seal the whole thing with a clear matte acrylic spray so the marker doesn't smear.
Good to knowWipe the wood with a dry cloth right before drawing. Dust makes the marker skip.
Common mistakeDon't skip sealing if the item gets handled. Untreated marker smudges fast.
16. Sunflower Side View on Ceramic Mug with Paint Pen
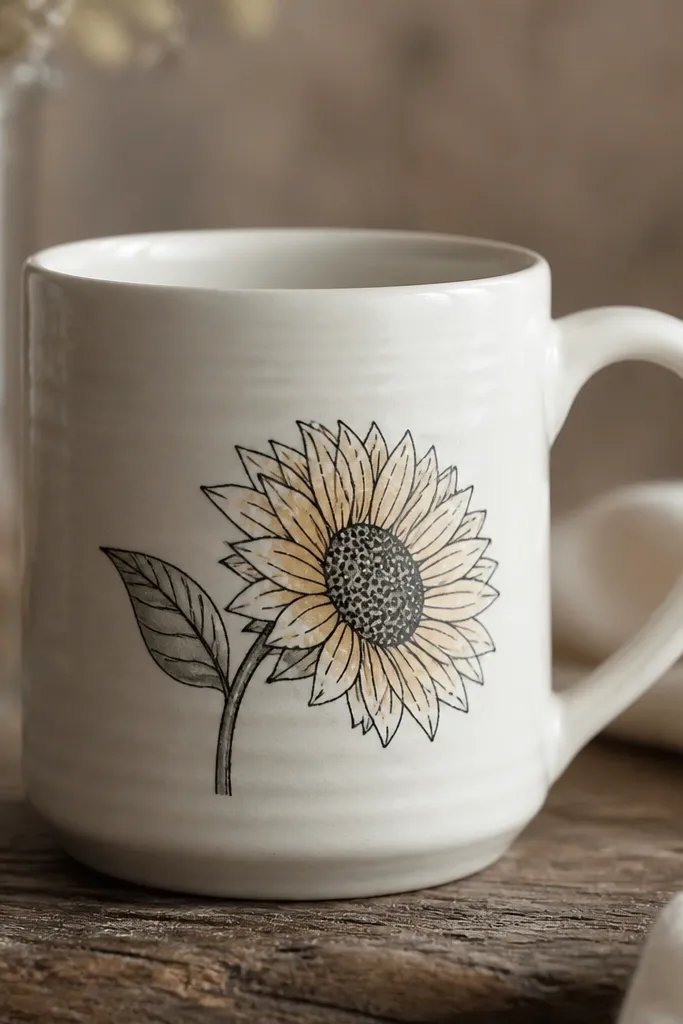
Mugs are where a side-view sunflower looks surprisingly classy because it reads like a tiny illustration. I use a paint pen approach because it's controlled and doesn't drip into glaze seams. The black outline makes it readable, and muted yellow petals keep it from looking childish. The dot seeds are the part that makes it feel handmade. This works for everyday use when you choose a food-safe paint pen and bake it after drawing.
Clean the mug thoroughly with rubbing alcohol and let it dry. Mark the sunflower placement at about 2 inches below the rim and near the handle side. Draw the side head facing toward the handle, then outline petals with black. Fill the petals with muted yellow using a paint pen tip - small taps work better than long lines. Dot the center with brown or black seeds, add a narrow leaf behind the head, and connect with a thin stem line. Bake according to your paint pen brand instructions for durability.
Good to knowPractice your seed dot size on paper first. On curved mugs, dots that are too large look like blobs.
Common mistakeDon't paint over glaze chips or cracks. The paint won't grip and it will peel.
17. Sunflower Side View with Colored Pencil Shading Only on Seeds
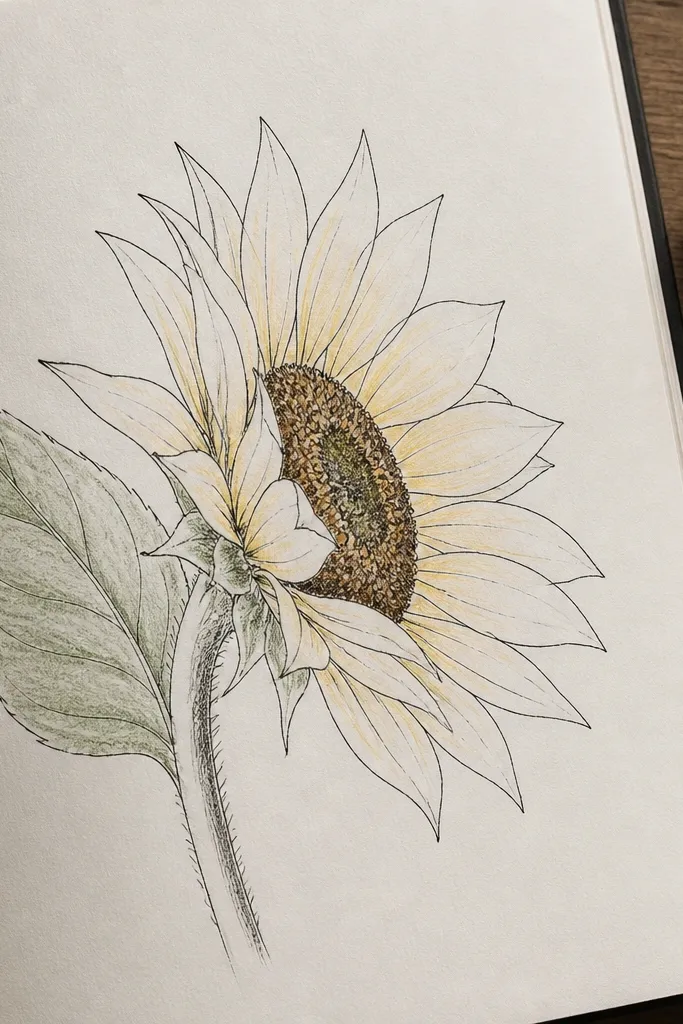
This style keeps the drawing low maintenance because you're limiting coloring to the seed area. Seeds take shading well since you're working in tiny shapes, so the pencil texture looks intentional. Side view makes the shading look directional, not random. I like it for people who want a more "illustration" feel without painting everything. It's also forgiving on paper - pencil can be erased and adjusted without wrecking the outline.
Sketch the side head and petals in pencil, then ink the outline with a fine pen. Leave petals mostly unfilled or add a very light wash of yellow pencil. For the seeds, shade by layering colored pencil in a few passes: start with light brown, then add darker brown on the lower half of the center. Blend lightly with a tissue if needed, but stop before it smears. Draw the leaf behind the head with green pencil and a single vein line, then darken the outer leaf outline.
Good to knowUse a sharp pencil tip so your seed shading stays in small strokes, not a big blur.
Common mistakeDon't shade the petals heavily. That's where it starts looking uneven and amateur.
18. Sunflower Side View on Reupholstered Chair Back Edge
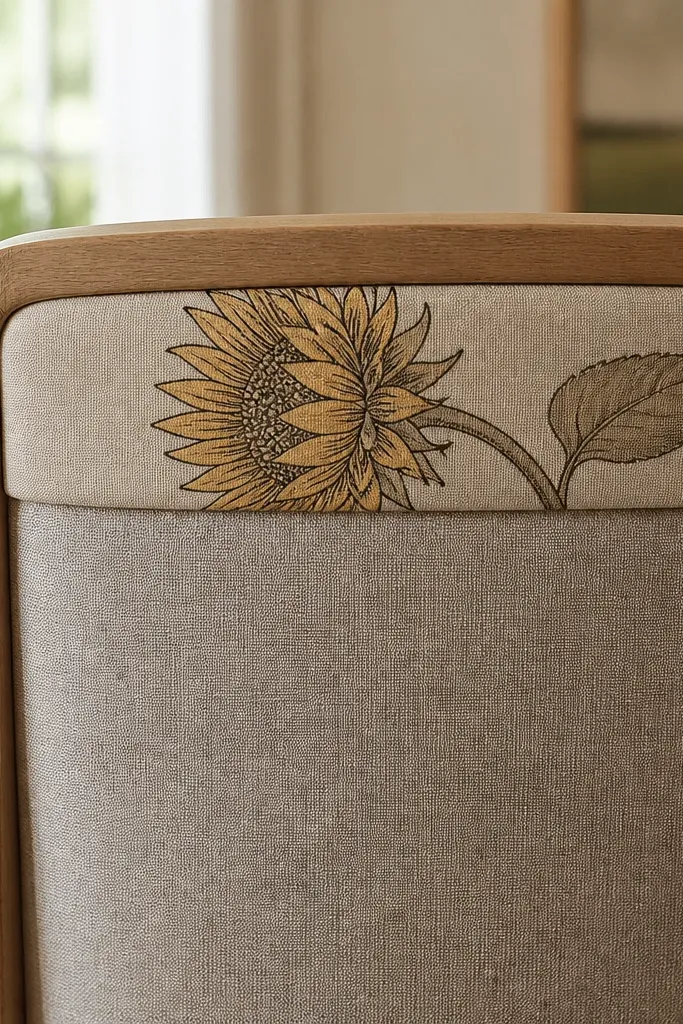
Chair backs are a weird test because the fabric stretches and light hits at angles. The side-view outline holds up better than a full frontal design because it needs fewer symmetrical lines. I like drawing the sunflower near the top edge of a chair back so it catches natural light when you sit - the petals show texture without the drawing getting lost. Muted yellow fill on neutral upholstery looks warm and calm. This is a good pick if you want one decorative element that makes the piece feel "restyled," not "unfinished."
Cut a small plain fabric patch if your upholstery has a busy pattern, or pick a spot with less print. Draw the side sunflower about 5 inches tall, keeping the stem aligned with the panel edge. Outline petals and leaf in a fabric-safe black marker, then fill petals with muted yellow in small sections. Add dot seeds in dark brown, then outline the seed base lightly again. Let everything dry fully, then apply a fabric fixative if your marker brand recommends it.
Good to knowStretch the fabric slightly while drawing so the final lines don't warp when the chair is in use.
Common mistakeDon't place the sunflower across heavy seam stitching. The line will crack where the fabric flexes.
19. Sunflower Side View on Upcycled Phone Case Frame
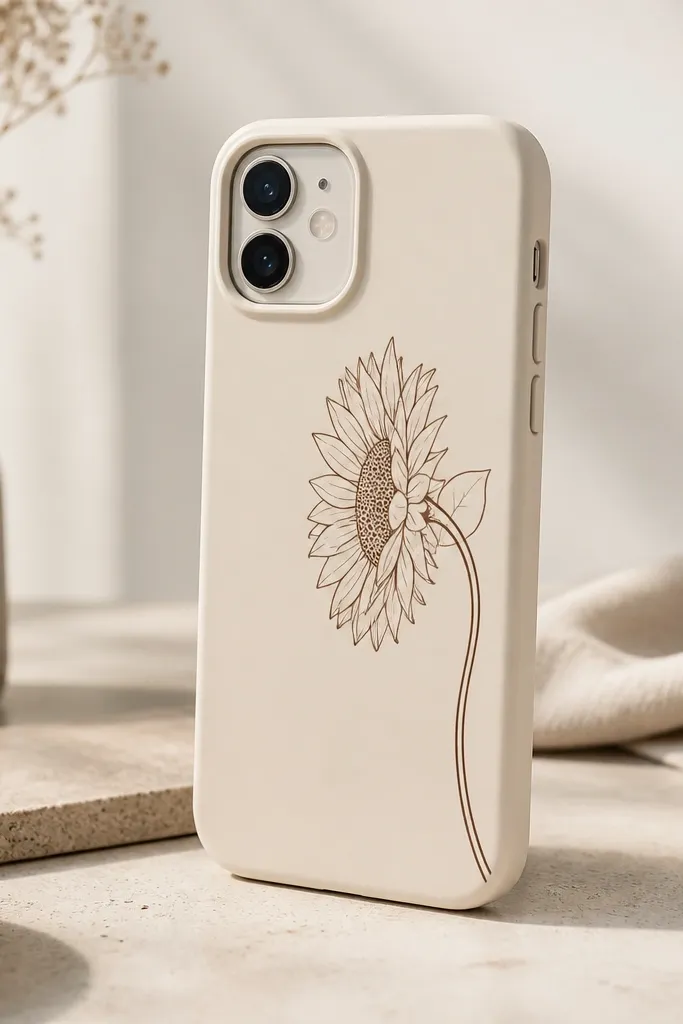
Phone cases are small, so the design needs thick readability. A side-view sunflower works because it uses a compact head shape and a single stem curve that fits the phone's vertical space. I like dark brown outlines with a light yellow fill because it looks like a tiny botanical label. The dot seeds are the easiest way to add detail without crowding. This style looks best on matte cases since glossy surfaces can make thin marker lines glare.
Clean the case surface with rubbing alcohol and dry it completely. Tape the area lightly so your hand has a stable grip. Draw the side head about 2.5 inches tall, facing left. Outline petal arcs in dark brown, then fill the petals lightly with a light yellow paint pen - keep it thin so it doesn't chip. Dot the center with darker brown seeds, add one narrow leaf behind the head, and connect with a curved stem line. Let it cure fully before snapping it onto the phone.
Good to knowIf your paint pen smears, let each layer dry longer than you think. Two short sessions look better than one rushed coat.
Common mistakeDon't use super fine liners on cases - the lines disappear into glare and make the sunflower look incomplete.